Making OpenWrt run on a random router
I’ve been going down the homelab rabbit hole for the past few months, trying to self-host a file server, Pi-hole, and a bunch of other things. While doing this, I realized that having better control over the security of your home network is really important. Initially I only started off by trying to get rid of my ISPs locked down router, there's an informative discussion here. if you're looking to do the same for JioFiber, I then started looking for OpenWrt-supported routers available on Amazon India. I could only find 2–3 devices with supported revisions, and they were costing at least around INR 5K, not something I wanted to spend just for experimentation, I then dug deeper in the OpenWrt supported hardware list and ended up finding a few cheaper alternatives around 1.5-2.5k, including the TP-Link Archer C6 and C20, although they were 8MB flash/64MB RAM devices which are about to be deprecated they seemed good enough for starting off. I managed to bag a TP-Link archer C20v5 for around 1.4K and installed a standard OpenWrt image on it.
Since I was already building a U-Boot and kernel image for the Mecha Comet, it occurred to me, why not try building one for my old spare router? My old router from 2017 is an iBall WRD75EU which definitely wasn't going to have any OpenWrt support for obvious reasons :).
Why OpenWrt?
OpenWrt is a Linux-based, open-source firmware for routers that replaces stock vendor firmware, it is highly vetted so it can't possibly have any hidden backdoors and is free as in freedom. It also gives you fine grained control over your network. You can utlize it to setup your own recursive DNS with Unbound, set up a network wide ad-blocker with Adguard home or Pi-hole, VPN and what not.
Opening up the Router
Opening up my old router and having a look at the PCB revealed that it has a MT7620 along with a MT7610E, Googling revealed that these are very well documented chipsets on OpenWrt, so this made me hopeful. Luckily for me, the board also had exposed UART headers to which I easily hooked up my USB to UART connector and started the console.
U-Boot 1.1.3 (Aug 25 2016 - 15:00:59)

Board: Ralink APSoC DRAM:  64 MB
relocate_code Pointer at: 83fb8000
enable ephy clock...done. rf reg 29 = 5
SSC disabled.
spi_wait_nsec: 29
spi device id: c2 20 17 c2 20 (2017c220)
find flash: MX25L6405D
raspi_read: from:30000 len:1000
*** Warning - bad CRC, using default environment

============================================
Ralink UBoot Version: 4.3.0.0
--------------------------------------------
ASIC 7620_MP (Port5<->None)
DRAM component: 512 Mbits DDR, width 16
DRAM bus: 16 bit
Total memory: 64 MBytes
Flash component: SPI Flash
WANLAN Config:WLLLL (MTC)
Date:Aug 25 2016  Time:15:00:59
============================================
icache: sets:512, ways:4, linesz:32 ,total:65536
dcache: sets:256, ways:4, linesz:32 ,total:32768

    ##### The CPU freq = 580 MHZ ####
    estimate memory size =64 Mbytes

Please choose the operation:
    1: Load system code to SDRAM via TFTP.
    2: Load system code then write to Flash via TFTP.
    3: Boot system code via Flash (default).
    4: Entr boot command line interface.
    7: Load Boot Loader code then write to Flash via Serial.
    9: Load Boot Loader code then write to Flash via TFTP.

You choosed 3
Funnily, since the bootdelay time was 0, it kept defaulting to boot 3 and the simple hack way to beat it was
while true; do printf "4"; done
I decided to first boot into the stock kernel to analyze a few things. To my big surprise the admin password turned out to be admin. I tried analyzing the flash layout:
# cat /proc/mtd dev:
size erasesize name
mtd0: 00800000 00010000 "ALL"
mtd1: 00030000 00010000 "Bootloader"
mtd2: 00010000 00010000 "Config"
mtd3: 00010000 00010000 "Factory"
mtd4: 007a0000 00010000 "Kernel"
mtd5: 00010000 00010000 "Second_Config"
At this point, I wasn’t planning a full port. I just wanted OpenWrt running. So I assumed maybe this was a white-labeled TP-Link device — it matched specs with the Archer C20 v1. So… why not just flash that image? 😄
That’s when I hit my first confusion: what’s the difference between a squashfs-sysupgrade image and a kernel image?
* a factory image is designed to replace the vendor's “stock” firmware. It matches the format of the file the vendor supplies. You usually use the vendor's Web GUI to install a factory image. Please mind that only approx. 30% of all supported devices do require the presence of a factory image. All other devices do not need this special factory image and are satisfied with a sysupgrade- or other image. See the respective devicepage for details regarding installation and which image to flash.
* A sysupgrade image (previously named trx image) is designed to replace an OpenWrt image. Use a sysupgrade image to update an OpenWrt system with a newer OpenWrt image.
and the kernel image likely just replaces your kernel with a newer one
The two images contain similar components (kernel + rootfs), but differ in how they are packaged. A factory image includes vendor-specific headers, while a sysupgrade image is tailored for OpenWrt’s upgrade mechanism. Generally speaking, the factory image is to be used with the OEM GUI or OEM flashing utilities to convert the device to OpenWrt. After that, use the sysupgrade images.
Since ignorance can be bliss (and knowing I wouldn’t brick the bootloader), I tried TFTP-booting the sysupgrade image. That’s when I got:
Bytes transferred = 6881612 (69014c hex)
NetBootFileXferSize= 0069014c
MT7620 # bootm 0x80000000
## Booting image at 80000000 ...
Bad Magic Number,03000000
This made me realize that TP-Link's magic number wasn't going to work with our device even though we were loading the image at the correct address.
I then found a MT7620-MT7610E Evaluation board image and it did boot, only to get stuck at a point
[ 1.760040] bridge: filtering via arp/ip/ip6tables is no longer available by default. Update your scripts to load br_netfilter if you need this.
[ 1.785873] 8021q: 802.1Q VLAN Support v1.8
[ 1.796948] /dev/root: Can't open blockdev
[ 1.805210] VFS: Cannot open root device "(null)" or unknown-block(0,0): error -6
[ 1.820121] Please append a correct "root=" boot option; here are the available partitions:
[ 1.836776] 1f00 192 mtdblock0
[ 1.836780] (driver?)
[ 1.849811] 1f01 64 mtdblock1
[ 1.849815] (driver?)
[ 1.862852] 1f02 64 mtdblock2
[ 1.862856] (driver?)
[ 1.875888] 1f03 7872 mtdblock3
[ 1.875892] (driver?)
[ 1.888922] Kernel panic - not syncing: VFS: Unable to mount root fs on unknown-block(0,0)
[ 1.905383] Rebooting in 1 seconds..
Unable to mount root filesystem huh, I suspected it having issues with writing at the correct offsets.
OpenWrt does not rely on a static root= parameter. Instead,
it uses the mtdsplit logic to detect a squashfs image inside
the firmware partition.
Because the partition size or offsets were wrong, the kernel could not detect the rootfs signature leading to the panic. I then decided to say chuck it and proceeded to download the OpenWrt source for a full manual build
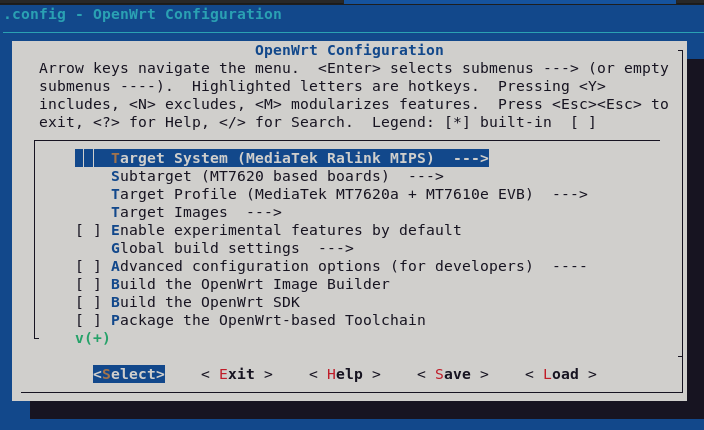
I used menuconfig to configure the image to the MT7620 config since I knew it could boot without giving me any bad magic number issues,
I just needed to fix the mount issue now.
Since the dts is supposed to handle all the stuff I proceeded to analyze them in /target/linux/ramips/dts/.
The mt7620a_ralink_mt7610e-evb.dts seemed pretty minimal without support for any LED pin indicators on my board, I thus decided to find more dts that matched my board layout.
I found the Asus RT-AC51U matched my board as well as the EVBs layout closely so I decided to try out its dts instead by modifying the parition layout to match mine.
&spi0 {
    status = "okay";

    flash@0 {
        #address-cells = <1>;
        #size-cells = <1>;

        partitions {
            compatible = "fixed-partitions";
            #address-cells = <1>;
            #size-cells = <1>;

            partition@0 {
                label = "u-boot";
                reg = <0x00000000 0x00030000>;
                read-only;
            };

            partition@30000 {
                label = "u-boot-env";
                reg = <0x00030000 0x00010000>;
                read-only;
            };

            partition@40000 {
                label = "factory";
                reg = <0x00040000 0x00010000>;
                read-only;

                nvmem-layout {
                    compatible = "fixed-layout";
                    #address-cells = <1>;
                    #size-cells = <1>;

                    macaddr_factory_28: macaddr@28 {
                        reg = <0x28 0x6>;
                    };

                    eeprom_factory_0: eeprom@0 {
                        reg = <0x0 0x200>;
                    };

                    eeprom_factory_8000: eeprom@8000 {
                        reg = <0x8000 0x200>;
                    };
                };
            };

            partition@50000 {
                label = "firmware";
                reg = <0x00050000 0x007b0000>;
            };
        };
    };
};
I modified the dts to match the addressing we previously saw in /proc/mtd
and built the image, praying that it boots.
And it did boot!
The kernel came up cleanly:
- MT7620A detected
- SPI NOR detected correctly
- Firmware split into kernel + rootfs
rootfs_datacreated- Ethernet working
- Both wireless radios initialized (mt76 drivers)
- OpenWrt 24.10.5 booted successfully
What started as “maybe I can just flash a TP-Link image” turned into debugging, partition reverse engineering, DTS frankensteining and a custom OpenWrt build!
I’ll tweak things a bit more, clean up the DTS, and maybe just maybe we can upstream the world’s only OpenWrt-supported iBall router build. :)